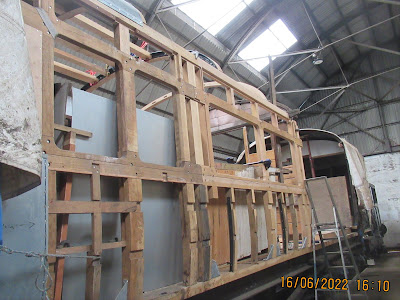
We're getting towards the end of our undercover period and whilst we may not have achieved absolutely everything we had hoped for we have made good progress having also encountered a few unforeseens, what railway project doesn't? Not least discovering the top of the Luggage end entrance vestibule partition had a broken joint which required some serious dismantling that we hadn't planned for. See pictures below. However today we came within a 'stones throw' of refitting the Drivers side entrance vestibule partition along with many of the roof supports that fit between the hoops fitted. We are hoping to sheet the carriage down making allowance to complete the unfinished work without too many problems. The latest pictures are shown below. Hope fully there will be some updated ones in the next few days so please look back again soon. Roof support fitting underway Partition trial fitted. Some small fettling required Half of the repaired roof beam.
November 2020 Welcome to the Blog of Restoration and News about Ex GWR Autotrailer 169. The project was started in 2002 when Auto 169 was obtained from a member of the Cholsey and Wallingford Railway. It is a major rebuild program involving the reconstruction of much of the major timber framework. The process has always been moving forward although sometimes faster than others mainly because of the unavailability of detailed drawings of the carriage so the production of new components has followed the careful removal of the fragile original ones followed by careful and painstaking reproduction. We are now in the position of shortly (COVID allowing) assembling the 3rd quarter section of the carriage. Once erected the new main framework will be complete to a point beyond the luggage end partition at the entrance vestibule. We intend to reuse most of the major partitions and crossways components, with repair, where necessary, and replace most of the lateral components. I will...
19/07/2023 With the assistance of a Hiab crane lorry and an early (for us) start the final section of the original bodywork of Auto 169 was removed from the chassis and work to save the last of the reusable parts was started. The final section although looking a little like its almost 100 years was actually quite sturdy giving credit to the carpenters who originally constructed it Lift off Once it had landed we set to work removing the remaining roof sections and recovering the roof hoops for reuse. The remaining wooden side parts were well beyond further use as carriage components although some may enter the recycling process to become pens! Going going....... Most of the roof is now gone and one of the roof hoops lies by the side for further use. A final tidy-up and a good day's work is complete Now we just need to separate the end section from the floor and remove the steel cladding from the outside before close examination and assessment of what work and repairs are needed pri...


Comments
Post a Comment